Build Flappy Ghost with Spec Kit, GitHub Copilot and Test-Driven Development
A hands-on guide to Specification-Driven Development using GitHub Spec Kit and GitHub Copilot on macOS and Windows.
1. The Use Case: Building Flappy Ghost
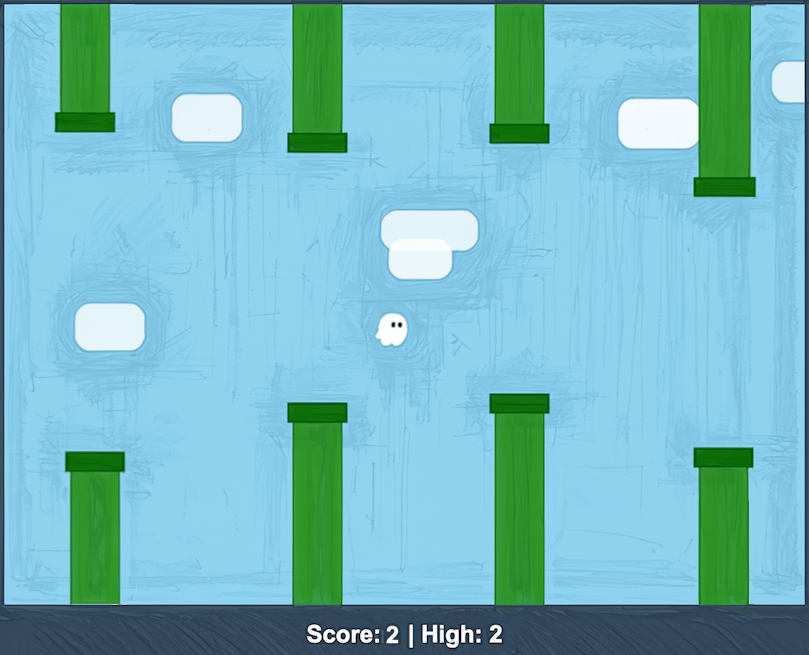
Let's build a simple browser-based arcade game called Flappy Ghost.
The concept is inspired by Flappy Bird. Instead of a bird, the player controls a little ghost (👻) that must navigate through obstacles without colliding with them.
The game will have the following features:
- A ghost character that moves up when the player presses Space or clicks the mouse.
- Gravity that continuously pulls the ghost downward.
- Green pipe obstacles with randomly generated gaps.
- Floating cloud obstacles.
- Collision detection between the ghost and obstacles.
- A scoring mechanism that awards points when the ghost passes through pipes.
- A high-score mechanism that persists between browser sessions.
- Game-over and restart functionality.
- A hand-drawn, pencil-sketch visual style.
The visual design will use a light blue background, green pipes, white clouds, a dark floor strip and a score display.
The objective is not simply to ask GitHub Copilot to generate the game. We will use Specification-Driven Development (SDD) to define requirements, produce a technical plan, break the work into tasks and implement the application systematically.
We will also incorporate Test-Driven Development (TDD), ensuring that automated tests are written before the corresponding production code.
By the end of this exercise, participants will have built a working browser game while experiencing how specification-driven AI-assisted development works.
2. What Is Specification-Driven Development (SDD)?
When developers use AI coding assistants, the typical workflow often looks like this:
Describe the application → Generate code → Fix errors → Test → Ship.
This approach can work for small applications, but it has limitations. Requirements are often undocumented, implementation decisions are implicit, and there is no clear traceability between what was requested and what was delivered.
Specification-Driven Development changes this workflow.
Instead of starting with code, we begin with a specification that describes the expected application behavior.
The specification becomes the reference point for planning, implementation and validation.
The typical SDD workflow is:
- Specify: Describe what needs to be built and why.
- Clarify: Identify ambiguities and resolve missing requirements.
- Plan: Define the architecture, technology stack and implementation approach.
- Tasks: Break the implementation into small, dependency-ordered tasks.
- Implement: Execute the tasks using an AI coding assistant.
- Validate: Verify that the implementation satisfies the original specification.
The artifacts generated during this process provide traceability between requirements and implementation.
A developer remains responsible for reviewing and approving the artifacts at every stage.
3. What Is GitHub Spec Kit?
GitHub Spec Kit is an open-source toolkit for implementing Specification-Driven Development.
It provides a CLI called specify that initializes a project with the required templates, scripts, configuration and AI coding-agent integration.
When initialized with GitHub Copilot, Spec Kit provides slash commands that can be invoked directly from GitHub Copilot Chat.
Some of the important commands are:
| Command | Purpose |
|---|---|
/speckit-constitution |
Establish project principles |
/speckit-specify |
Generate the specification |
/speckit-clarify |
Identify and resolve ambiguities |
/speckit-plan |
Generate the implementation plan |
/speckit-checklist |
Review specification quality |
/speckit-tasks |
Generate implementation tasks |
/speckit-analyze |
Analyze consistency across artifacts |
/speckit-implement |
Execute implementation tasks |
/speckit-converge |
Validate implementation against the artifacts |
These are GitHub Copilot agent skills, not commands that are executed in the operating-system terminal.
For this tutorial, we will use GitHub Copilot in Agent mode inside Visual Studio Code.
4. Technology Stack
We will use a deliberately simple technology stack. The objective is to focus on SDD and TDD rather than learning a frontend framework.
| Component | Technology |
|---|---|
| AI coding assistant | GitHub Copilot |
| Specification framework | GitHub Spec Kit |
| IDE | Visual Studio Code |
| Programming language | JavaScript |
| Graphics | HTML5 Canvas |
| Styling | HTML and CSS |
| Testing | Node.js built-in test runner |
| Package management | uv (for Spec Kit installation) |
| Version control | Git |
| Local web server | Python |
The game logic will be separated from the rendering code. This is important because we want to test the game mechanics independently of the browser.
We will use JavaScript ES modules with .mjs extensions and Node.js's built-in test runner. No Jest, Mocha, React, Angular, game engine or external runtime libraries are required.
5. Prerequisites
Before starting, ensure that the following tools are available.
| Requirement | Purpose |
|---|---|
| macOS or Windows 10/11 | Development environment |
| Python 3.11 or later | Required by Spec Kit |
| uv | Python package and tool manager |
| Git | Version control |
| Node.js 20 or later | JavaScript runtime and automated testing |
| Visual Studio Code | Development environment |
| GitHub Copilot | AI coding assistant |
| Modern browser | Running the game |
You should also have:
- A GitHub account with Copilot access.
- GitHub Copilot and Copilot Chat extensions enabled in VS Code.
- An internet connection to install the required tools and initialize Spec Kit.
Verify existing installations
macOS Terminal:
python3 --version
git --version
node --version
npm --version
brew --version
Windows PowerShell:
py --version
git --version
node --version
npm --version
winget --version
6. Install Spec Kit and Initialize the Project
We will create a workspace named workshop2 and initialize a new project named flappy-ghost inside it.
There are two supported approaches for installing and running Spec Kit:
- Persistent installation using
uv tool install. - One-time execution using
uvx.
For this tutorial, we will use persistent installation because it makes the specify command available for subsequent operations.
6.1 macOS Setup
Open Terminal.
Step 1: Create the workspace
pwd
mkdir -p workshop2
cd workshop2
Step 2: Install uv
Using Homebrew:
brew install uv
Verify:
uv --version
Step 3: Install Python, Git and Node.js
brew install python git node
Verify:
python3 --version
git --version
node --version
npm --version
Make sure Python is version 3.11 or later.
Step 4: Install the Spec Kit CLI
Install Spec Kit directly from its GitHub repository.
uv tool install specify-cli --from git+https://github.com/github/spec-kit.git
This installs the CLI persistently in the uv tool environment.
Verify:
specify version
Step 5: Initialize the Flappy Ghost project
specify init flappy-ghost --integration copilot
Navigate to the project:
cd flappy-ghost
Initialize Git:
git init
Open the project in Visual Studio Code:
code .
The project is now initialized with the GitHub Copilot integration.
6.2 Windows Setup
The same workflow can be executed using Windows PowerShell. WSL is not required because current Spec Kit versions support native PowerShell scripts.
Open PowerShell.
Step 1: Create the workspace
pwd
New-Item -ItemType Directory -Force workshop2
cd workshop2
Step 2: Install uv
Using Windows Package Manager:
winget install --id=astral-sh.uv -e
Alternatively, use the official PowerShell installer:
powershell -ExecutionPolicy ByPass -c "irm https://astral.sh/uv/install.ps1 | iex"
Open a new PowerShell window after installation.
Verify:
uv --version
Step 3: Install Python, Git and Node.js
winget install --id=Python.Python.3.12 -e
winget install --id=Git.Git -e
winget install --id=OpenJS.NodeJS.LTS -e
Restart PowerShell and verify:
py --version
git --version
node --version
npm --version
Make sure Python is version 3.11 or later.
Step 4: Install Spec Kit
uv tool install specify-cli --from git+https://github.com/github/spec-kit.git
Verify:
specify version
Step 5: Initialize the project
specify init flappy-ghost --integration copilot
cd flappy-ghost
git init
code .
If code is not recognized, enable the VS Code command-line launcher or use File → Open Folder in VS Code.
Alternative: Run Spec Kit using uvx
If you do not want to install Spec Kit persistently, you can use uvx.
Run the complete command:
uvx --from git+https://github.com/github/spec-kit.git specify init flappy-ghost --integration copilot
The same command works in PowerShell.
Important: uvx is a one-time runner. It does not install a persistent specify command on your PATH. Therefore, do not run uvx alone and then expect to execute specify init separately.
For this exercise, I recommend the persistent installation approach.
7. Explore the Spec Kit Project Structure
After initialization, open the project in VS Code.
Explore the generated files and folders.
You should see the Spec Kit configuration and integration files, including the .specify and .github directories.
The exact generated structure can vary by release and integration configuration.
Open GitHub Copilot Chat.
Switch to Agent mode.
Start typing /speckit- in the prompt box.
You should see the available Spec Kit commands.
Remember that these commands must be executed individually in Copilot Chat, not in the Terminal.
8. Step 1 – Establish Project Principles
Before describing the application, let's establish the engineering principles that must be followed throughout the project.
In GitHub Copilot Chat, execute:
/speckit-constitution

Create the project constitution for Flappy Ghost.

The project must follow these engineering principles:

1. Strict Test-Driven Development.
   - Tests must be written before production code.
   - Follow the Red-Green-Refactor cycle.
   - Never modify or weaken a test simply to make it pass.
   - Implement only the minimum code required to pass the current tests.

2. Separate game logic from rendering and browser interaction.

3. Use modular, readable and maintainable JavaScript.

4. Keep game logic deterministic and independently testable.

5. Use dependency injection for random number generation, time-dependent behavior and storage where appropriate.

6. Use Node.js built-in testing capabilities.

7. Do not introduce unnecessary third-party dependencies.

8. Every feature must be traceable to a requirement
   and an acceptance criterion.

9. Run automated tests after every implementation change.

10. Do not implement functionality outside the approved specification.

Document these principles in the project constitution.
Copilot will generate or update the constitution.
Review the document before moving to the next step.
The constitution establishes the rules that should guide subsequent planning and implementation.
9. Step 2 – Specify the Flappy Ghost Game
Now we describe the application.
The specification should focus on what the application must do and why. Avoid prescribing the technology stack at this stage.
Execute the following in Copilot Chat:
/speckit-specify

Build a browser-based arcade game called "Flappy Ghost".

The player controls a small ghost character that must fly through obstacles without colliding with them.

Game requirements:

1. Player Character
   - Represent the player using a ghost emoji (👻).
   - Position the ghost towards the left side of the screen.
   - Gravity continuously pulls the ghost downward.
   - Pressing Space or clicking the mouse makes the ghost flap upward.

2. Obstacles
   - Green pipes enter the screen from the right.
   - Each pipe consists of a top and bottom pipe
     with a gap between them.
   - Pipe positions and gaps vary.
   - Floating cloud obstacles appear in the game area.
   - Obstacles move from right to left.

3. Collision Detection
   - Detect collision between the ghost and pipes.
   - Detect collision between the ghost and clouds.
   - Detect collision with the ceiling and floor.
   - Any collision ends the game.

4. Scoring
   - Award one point when the ghost successfully passes a pipe pair.
   - A pipe pair must award points only once.
   - Display the current score and highest score.

5. High Score
   - Persist the highest score between browser sessions.
   - Store the value using browser local storage.

6. Game States
   - Initial ready-to-play screen.
   - Active gameplay.
   - Game-over screen.
   - Restart functionality.
   - Restarting resets the current score but preserves the high score.

7. Visual Design
   - Light blue background.
   - Hand-drawn/pencil-sketch visual style.
   - Green pipes with slightly irregular outlines.
   - Rounded white cloud obstacles.
   - Dark grey floor strip.
   - HUD displaying "Score: X | High: X".
   - Rotate the ghost slightly according to its vertical movement.

8. User Experience
   - Support keyboard and mouse controls.
   - Display instructions to press Space or click to start.
   - Allow restarting after Game Over.
   - Scale the game appropriately for different browser sizes.

Acceptance criteria:

Write user stories and detailed Given/When/Then scenarios.

Cover:
- Starting the game.
- Gravity and flap behavior.
- Pipe generation and movement.
- Cloud obstacles.
- Collision detection.
- Score calculation.
- High-score persistence.
- Game-over behavior.
- Restart behavior.

Include functional and non-functional requirements.

Do not generate implementation code.
Do not decide the technical architecture yet.
Copilot should generate a specification containing user stories, functional requirements and acceptance scenarios.
For example:
Feature: Ghost flight mechanics

Scenario: Ghost flaps upward

Given the game is active
And the ghost is affected by gravity
When the player presses the Space key
Then the ghost should receive an upward velocity
And the ghost should move upward
Review the generated specification.
Make sure the requirements accurately describe the expected gameplay.
10. Step 3 – Clarify Requirements
Before designing the implementation, we should identify missing or ambiguous requirements.
/speckit-clarify

Review the Flappy Ghost specification.

Focus on these areas:

1. What happens when Space is pressed before the game starts?
2. Can the player flap continuously?
3. How should terminal velocity work?
4. How is collision between the ghost and obstacles determined?
5. Should touching the ceiling result in Game Over?
6. When exactly should a pipe pair award a point?
7. How should the high score be retained after refreshing the browser?
8. What happens to the high score when the player restarts?
9. How should the game behave when the browser window is resized?
10. What happens when Space is pressed on the Game Over screen?

Identify gaps and ask targeted questions.

Do not make assumptions about important gameplay behavior.

Update the specification after receiving my answers.
Participants should answer the questions raised by Copilot and review the updated specification.
Some suggested decisions:
| Area | Expected behavior |
|---|---|
| Space before start | Starts the game and flaps |
| Repeated flaps | Each valid key press triggers a flap |
| Gravity | Continues until terminal velocity |
| Pipe collision | Any overlap causes Game Over |
| Cloud collision | Any overlap causes Game Over |
| Ceiling | Collision causes Game Over |
| Scoring | One point per successfully passed pipe pair |
| High score | Saved in local storage |
| Restart | Resets current score, preserves high score |
| Resize | Canvas maintains its aspect ratio |
11. Step 4 – Generate the Technical Implementation Plan
Now that the requirements are clear, we can introduce the technology stack and architecture.
/speckit-plan

Create the technical implementation plan for Flappy Ghost.

Technology requirements:

- Vanilla JavaScript using ES modules.
- HTML5 Canvas for game rendering.
- HTML and CSS for the game page and overlays.
- Node.js built-in test runner (node:test).
- Use .mjs file extensions for JavaScript modules.
- No React, Angular, Vue or other frontend frameworks.
- No third-party game engine.
- No third-party testing frameworks.
- No external runtime dependencies.
- No build tools or bundlers.

Architecture requirements:
Separate the application into these components:

1. index.html
   Main browser page containing the canvas and game UI.

2. src/game-logic.mjs
   Pure game logic including:
   - Initial game state
   - Ghost movement
   - Gravity
   - Flap mechanics
   - Pipe movement
   - Collision detection
   - Scoring
   - Restart behavior

3. src/game-renderer.mjs
   Canvas-based rendering:
   - Background
   - Ghost
   - Pipes
   - Clouds
   - Floor
   - Score HUD
   - Game-over overlay

4. src/high-score-store.mjs
   High-score persistence and storage abstraction.
   Make storage behavior independently testable.

5. src/main.mjs
   Application entry point:
   - Keyboard events
   - Mouse events
   - Game loop using requestAnimationFrame
   - Browser localStorage integration
   - Connecting the renderer and game logic

6. tests/game-logic.test.mjs
   Automated tests for game logic.

7. tests/high-score-store.test.mjs
   Automated tests for high-score persistence.

Testing requirements:
- Use node:test and node:assert/strict.
- Game logic must not directly depend on DOM or Canvas APIs.
- Make random number generation deterministic during tests.
- Make time-step behavior controllable during tests.
- Inject storage behavior where persistence needs testing.

The application must support:
node --test

Generate a technical plan covering:
- Component responsibilities.
- Data flow.
- Game state management.
- Physics calculations.
- Collision detection.
- Testing strategy.
- File structure.

Do not implement the application yet.
The architecture should allow game mechanics to be tested independently of the browser.
For example, gravity, collision detection and scoring should not depend on Canvas or DOM APIs.
Review plan.md.
12. Step 5 – Generate the Requirements Checklist
Now let's validate the completeness and quality of the specification.
/speckit-checklist

Create a quality checklist for the Flappy Ghost specification.

Focus on:

- Completeness of gameplay requirements.
- Physics and collision behavior.
- Score and high-score rules.
- Game states and restart behavior.
- Testability of functional requirements.
- Accessibility and responsive layout.
- Clear Given/When/Then acceptance criteria.
- Ambiguous or contradictory requirements.
Review the generated checklist.
Remember that this is a requirements-quality checklist, not the automated test suite. Mark requirements-quality items complete only after reviewing them.
13. Step 6 – Generate Implementation Tasks
This is an important step because we want to enforce TDD.
/speckit-tasks

Generate dependency-ordered implementation tasks.

Strict TDD requirement:

For every game feature, create separate tasks in this order:
1. Write automated tests.
2. Run the tests and observe expected failures.
3. Implement the minimum production code.
4. Run tests again and confirm they pass.
5. Refactor without changing expected behavior.
6. Run the complete test suite.

Do not combine test-writing and production implementation
into a single task.

Organize the work into these phases:
Phase 1: Project setup
- HTML structure
- Canvas initialization
- JavaScript module structure
- Node.js test setup

Phase 2: Ghost mechanics
- Tests for initial state
- Tests for flap mechanics
- Tests for gravity
- Tests for terminal velocity
- Implementation of ghost mechanics

Phase 3: Obstacles
- Tests for pipe positioning
- Tests for pipe movement
- Tests for cloud obstacles
- Implementation of obstacle mechanics

Phase 4: Collision detection
- Tests for pipe collisions
- Tests for cloud collisions
- Tests for floor and ceiling collisions
- Implementation of collision logic

Phase 5: Score and game state
- Tests for score increment
- Tests to prevent duplicate scoring
- Tests for high-score persistence
- Tests for game over
- Tests for restart behavior
- Implementation of scoring and game states

Phase 6: Rendering and interaction
- Canvas rendering
- Keyboard and mouse controls
- HUD and overlays
- Responsive layout
- Visual styling

Phase 7: Final validation
- Full automated test suite
- Browser testing
- Acceptance criteria verification

Use the project constitution, specification and plan as the source of truth.

Ensure all tests are written before their corresponding production logic.
Review tasks.md.
Make sure the generated tasks are dependency-ordered and that test-writing tasks appear before their corresponding implementation tasks.
14. Step 7 – Analyze Specifications, Plans and Tasks
Before implementation, analyze the generated artifacts for inconsistencies.
/speckit-analyze

Analyze the completed project artifacts.

Check:
1. Every user story has corresponding implementation tasks.
2. Every business rule has acceptance criteria.
3. Tests precede their corresponding production-code tasks.
4. The implementation plan follows the project constitution.
5. The architecture supports independent unit testing.
6. No requirements are missing or contradictory.

Identify conflicts, gaps and ambiguities.

Do not implement anything.
Provide a prioritized list of findings.
This is a quality gate. Resolve important issues in the source artifacts and rerun the analysis before implementation.
15. Step 8 – TDD Demonstration: Create a Deliberately Failing Test
Now comes the most important part of the exercise.
We will demonstrate the Red-Green-Refactor cycle using the ghost's flap mechanism.
The requirement is simple:
When the player presses Space or clicks the mouse, the ghost should receive an upward velocity.
Rather than asking Copilot to implement this functionality, we will first ask it to write an automated test.
15.1 Write the test first
In GitHub Copilot Chat:
/speckit-implement

Implement ONLY the test-writing task for the first TDD slice: Ghost flap mechanics.

Create tests/game-logic.test.mjs.

Use:
- node:test
- node:assert/strict

Write a test for the following requirement:
Given a ghost with vertical velocity of zero, when the flap action is triggered,
then the ghost must receive a negative vertical velocity indicating upward movement.

Also verify that the original game state is not mutated.

Import the flap function from:
../src/game-logic.mjs

Important:
- Write tests only.
- Do not create or modify production source files.
- Do not implement the flap function.
- Do not weaken the assertions.
- Stop after creating the test.
The test should be equivalent to:
import test from 'node:test';
import assert from 'node:assert/strict';

import { flap } from '../src/game-logic.mjs';

test('flap applies upward velocity to the ghost', () => {
    const state = {
        ghost: {
            y: 100,
            velocityY: 0
        }
    };

    const nextState = flap(state);

    assert.ok(nextState.ghost.velocityY < 0);

    // Original state must not be mutated.
    assert.equal(state.ghost.velocityY, 0);
});
15.2 Run the test
Open the VS Code integrated terminal.
node --test tests/game-logic.test.mjs
On Windows PowerShell, use the same command.
The test will initially fail because the production module or exported function does not exist.
This is expected. However, this first failure is a module-loading failure, so we will create a placeholder to demonstrate a meaningful assertion failure.
15.3 Create a non-functional implementation stub
Ask Copilot:
Create src/game-logic.mjs.

Export a function named flap(state).

For now, return the original state unchanged.

Do not implement any game mechanics.
Do not modify the existing test file.
The generated code should look like:
export function flap(state) {
    return state;
}
15.4 Run the test again
node --test tests/game-logic.test.mjs
This time, the module loads successfully, but the test fails because the ghost's vertical velocity remains zero.
Expected outcome: RED
✗ flap applies upward velocity to the ghost
The assertion fails because:
nextState.ghost.velocityY < 0
evaluates to false.
This is our deliberately failing test.
15.5 Implement the minimum code to make the test pass
Now ask Copilot:
The flap test is failing.

Implement the minimum code necessary to make this test pass.

Requirements:
1. Do not modify the test.
2. Do not remove or weaken assertions.
3. The flap action must apply a negative vertical velocity.
4. Return a new game state without mutating the original.
5. Do not implement gravity, collision detection,
   rendering or any other feature yet.

Only implement what is necessary to make the current test pass.
A minimal implementation would look like:
const FLAP_VELOCITY = -360;

export function flap(state) {
    return {
        ...state,
        ghost: {
            ...state.ghost,
            velocityY: FLAP_VELOCITY
        }
    };
}
15.6 Run the test again
node --test tests/game-logic.test.mjs
Expected outcome: GREEN
✔ flap applies upward velocity to the ghost

tests 1
pass 1
fail 0
15.7 Refactor
Now ask Copilot to review the implementation.
Review the flap implementation.

Refactor for readability and maintainability.

Do not change the existing tests.
Do not change the expected behavior.

Run the tests again and confirm that they still pass.
Expected outcome: REFACTOR
The implementation is improved without changing its behavior or weakening the tests.
This completes our first TDD cycle.
The important learning is that Copilot is not the authority that decides whether its code is correct. Automated tests provide evidence that the implementation satisfies the expected behavior.
16. Step 9 – Continue TDD for the Remaining Features
After demonstrating the first failing test, participants should repeat the same cycle for the remaining game features.
Gravity and physics
Write tests verifying:
- Gravity increases downward velocity over time.
- The ghost's vertical position changes according to velocity.
- Terminal velocity prevents unlimited acceleration.
- Physics updates behave deterministically when delta time is supplied.
Copilot prompt:
/speckit-implement

Implement only the test-writing tasks for gravity.

Write tests verifying:
1. Gravity increases the ghost's downward velocity.
2. The ghost's vertical position changes according to velocity.
3. Terminal velocity prevents unlimited acceleration.
4. Physics updates are deterministic when delta time is supplied.

Do not implement production code.

After writing the tests, stop.
Run the tests, observe the failures and then ask Copilot to implement the minimum code required to pass them.
Pipe movement and obstacles
Write tests verifying:
- Pipes are generated within valid game boundaries.
- Pipe gaps are within the configured limits.
- Pipes move from right to left.
- Cloud obstacles are generated and moved correctly.
- Obstacle generation can be tested deterministically.
Collision detection
Copilot prompt:
/speckit-implement

Implement only the test-writing tasks for collision detection.

Write tests for:
1. Ghost overlapping a pipe.
2. Ghost not overlapping a pipe.
3. Ghost touching a cloud obstacle.
4. Ghost colliding with the ceiling.
5. Ghost colliding with the floor.
6. Two objects touching edges without overlapping.

Use deterministic test inputs.

Do not implement collision detection yet.
Do not modify existing tests.
After the tests are created, implement collision detection without changing the tests.
Scoring
Copilot prompt:
/speckit-implement

Write tests first for scoring behavior.

Verify that:

1. Passing a pipe pair increments the score by one.
2. The same pipe pair cannot award multiple points.
3. A second pipe pair awards another point.
4. Restart resets the current score.

Do not write production scoring code yet.
Do not modify existing tests.
High-score persistence
Copilot prompt:
/speckit-implement

Write automated tests for high-score behavior.

Verify that:
1. A new high score replaces the previous high score.
2. A lower score does not replace the high score.
3. The high score is correctly saved.
4. The high score can be retrieved after a simulated reload.
5. Restart preserves the high score.

Use an injected fake storage implementation
so the tests can execute in Node.js.

Do not implement production logic yet.
For each feature, repeat:
- Write tests.
- Run tests and inspect failures.
- Implement the minimum code.
- Run tests and verify they pass.
- Refactor.
- Run the complete test suite.
Run the full suite using:
node --test
For continuous testing while editing:
node --test --watch
The commands work in both macOS Terminal and Windows PowerShell.
17. Step 10 – Implement Rendering and the Browser Interface
Once the game logic and its tests are working, implement the rendering and browser interaction.
In Copilot Chat:
/speckit-implement

Implement the rendering and user-interface tasks.

Requirements:
1. Create the main index.html page.
2. Add an HTML5 canvas.
3. Implement the rendering module.
4. Draw the light blue background with pencil strokes.
5. Draw green pipes with slightly irregular outlines.
6. Draw the ghost emoji and rotate it based on velocity.
7. Draw floating white clouds.
8. Draw the dark grey floor strip.
9. Display current score and high score.
10. Display the initial game instructions.
11. Display a Game Over overlay.
12. Add a restart interaction.
13. Implement keyboard and mouse controls.
14. Use requestAnimationFrame for the game loop.

Use the existing game logic module.
Do not duplicate game logic inside the renderer.

Preserve all existing automated tests.
Run the full test suite after implementation.
For visual refinement:
Improve the visual design of Flappy Ghost.

The game should resemble a hand-drawn pencil sketch.

- Light blue background (#a8d5e8).
- Pencil-like diagonal background strokes.
- Green pipes with slightly irregular edges.
- Ghost emoji at approximately 34px.
- White rounded cloud obstacles with subtle shadows.
- Dark grey floor (#2d2d2d).
- Floor height approximately 40px.
- Monospace score display in white.
- Smooth movement and animation.

Maintain readable contrast and ensure the gameplay area remains clear.

Do not modify game rules or weaken tests.
18. Step 11 – Run the Game Locally
We can use Python's built-in HTTP server to serve the application locally.
No additional server framework is needed.
Navigate to the project root.
macOS:
python3 -m http.server 8000
Windows:
py -m http.server 8000
Open another terminal window.
macOS:
open http://localhost:8000
Windows PowerShell:
Start-Process http://localhost:8000
The Flappy Ghost game should now be available in the browser.
Manual testing checklist
| Action | Expected result |
|---|---|
| Open game | Start screen appears |
| Press Space | Ghost moves upward |
| Release Space | Gravity pulls ghost down |
| Click mouse | Ghost flaps |
| Hit a pipe | Game Over |
| Hit a cloud | Game Over |
| Hit the floor | Game Over |
| Pass a pipe pair | Score increases |
| Restart | Current score resets |
| Reload browser | High score is retained |
Run the complete automated test suite again:
node --test
Stop the Python web server using Ctrl+C.
19. Step 12 – Validate Implementation Against the Specification
The final step is to verify that the implementation actually satisfies the original requirements.
Start by running:
/speckit-analyze

Analyze the completed implementation against:

- Project constitution.
- spec.md.
- plan.md.
- tasks.md.

Identify:
- Missing functionality.
- Requirements that are not implemented.
- Tasks that remain incomplete.
- Differences between acceptance criteria and actual behavior.
- Architectural issues.
- Test coverage gaps.

Do not modify existing tests to hide failures.

Provide a prioritized list of findings.
Now execute:
/speckit-converge

Compare the actual implementation against the specification, implementation plan and task list.

Identify missing features and incomplete requirements.

Append remaining work to tasks.md where necessary.

Do not mark incomplete tasks as complete.
Do not modify tests to conceal missing functionality.
If additional work is identified, use:
/speckit-implement

Implement the remaining tasks identified during convergence.

Maintain the project's TDD principles.

Write tests before implementing new behavior.

Run the complete automated test suite after each change.
Repeat the analysis and convergence process until the implementation satisfies the specification.
20. Step 13 – Commit the Completed Project
Once all tests pass and the application has been validated:
git status
git add .
git commit -m "Implement Flappy Ghost using Spec-Kit and TDD"
The final project structure should look approximately like this:
flappy-ghost/
│
├── .github/
│   └── ... Copilot integration files
│
├── .specify/
│   └── ... Spec Kit configuration and templates
│
├── specs/
│   └── ... Feature specification
│
├── src/
│   ├── game-logic.mjs
│   ├── game-renderer.mjs
│   ├── high-score-store.mjs
│   └── main.mjs
│
├── tests/
│   ├── game-logic.test.mjs
│   └── high-score-store.test.mjs
│
├── index.html
├── styles.css
└── README.md
The exact directories and generated Spec Kit files can vary by release.
21. Complete Command Reference
macOS
# Create workspace
pwd
mkdir -p workshop2
cd workshop2

# Install development tools
brew install uv
brew install python git node

# Verify installations
uv --version
python3 --version
git --version
node --version

# Install Spec Kit
uv tool install specify-cli --from git+https://github.com/github/spec-kit.git@v1.4.0

# Verify
specify version

# Initialize project
specify init flappy-ghost --integration copilot

# Navigate and open
cd flappy-ghost
git init
code .

# Run tests
node --test

# Run browser server
python3 -m http.server 8000

# Open game
open http://localhost:8000
Windows PowerShell
# Create workspace
pwd
New-Item -ItemType Directory -Force workshop2
cd workshop2

# Install development tools
winget install --id=astral-sh.uv -e
winget install --id=Python.Python.3.12 -e
winget install --id=Git.Git -e
winget install --id=OpenJS.NodeJS.LTS -e

# Restart PowerShell before continuing

# Verify installations
uv --version
py --version
git --version
node --version

# Install Spec Kit
uv tool install specify-cli --from git+https://github.com/github/spec-kit.git@v1.4.0

# Verify
specify version

# Initialize project
specify init flappy-ghost --integration copilot

# Navigate and open
cd flappy-ghost
git init
code .

# Run tests
node --test

# Run browser server
py -m http.server 8000

# Open game
Start-Process http://localhost:8000
GitHub Copilot Commands
Execute these commands individually in GitHub Copilot Chat, Agent mode:
/speckit-constitution
/speckit-specify
/speckit-clarify
/speckit-plan
/speckit-checklist
/speckit-tasks
/speckit-analyze
/speckit-implement
/speckit-converge
22. Key Takeaways
By completing this exercise, participants will understand:
- How to convert an idea into a structured specification.
- How to use GitHub Spec Kit with GitHub Copilot.
- The difference between requirements, technical planning and implementation.
- How to generate dependency-ordered development tasks.
- How to make AI coding agents follow Test-Driven Development.
- How to deliberately create and investigate a failing test.
- How to use automated tests to validate AI-generated code.
- How to maintain traceability between requirements, tasks, tests and implementation.
- How to validate the final application against the original specification.
The key takeaway is that AI-assisted development should not be limited to generating code from prompts.
With Specification-Driven Development, the AI coding assistant works against a documented specification, an approved technical plan and clearly defined implementation tasks.
Adding Test-Driven Development makes the process stronger: tests define the expected behavior before implementation, and the developer can use their results to validate what the AI produces.
The goal is not to write more code with AI. It is to build the right software with a process that makes the outcome verifiable.
References
About the author
I’m Siddhesh, a Microsoft Certified Trainer, cloud architect, and AI practitioner focused on helping developers and organizations adopt AI effectively. As a Pluralsight instructor and speaker, I design and deliver hands-on AI enablement programs covering Generative AI, Agentic AI, Azure AI, and modern cloud architectures.
With a strong foundation in Microsoft .NET and Azure, my work today centers on building real-world AI solutions, agentic workflows, and developer productivity using AI-assisted tools. I share practical insights through workshops, conference talks, online courses, blogs, newsletters, and YouTube—bridging the gap between AI concepts and production-ready implementations.
Comments
Join the discussionNo comments yet. Be the first to comment.