How I Built and Published a VS Code Extension to the Marketplace
A step-by-step guide using Amazon Q Log Session Viewer extension as a real-world example
I’m Siddhesh, a Microsoft Certified Trainer, cloud architect, and AI practitioner focused on helping developers and organizations adopt AI effectively. As a Pluralsight instructor and speaker, I design and deliver hands-on AI enablement programs covering Generative AI, Agentic AI, Azure AI, and modern cloud architectures.
With a strong foundation in Microsoft .NET and Azure, my work today centers on building real-world AI solutions, agentic workflows, and developer productivity using AI-assisted tools. I share practical insights through workshops, conference talks, online courses, blogs, newsletters, and YouTube—bridging the gap between AI concepts and production-ready implementations.
Introduction
I recently built Q Log Session Viewer — a VS Code extension that reads Amazon Q chat history and debug logs from your local machine and displays them in a browsable, filterable UI right inside VS Code. In this post I'll walk through every step: scaffolding the project, writing the extension code, packaging it, and publishing it to the VS Code Marketplace.
By the end you'll have a clear mental model of how VS Code extensions work and a repeatable process for publishing your own.
What We're Building
The extension adds an Activity Bar icon (sidebar panel) and a full editor panel that reads:
~/.aws/amazonq/history/chat-history-*.json— Amazon Q chat history%APPDATA%\Code\logs\...\Amazon Q Logs.log— VS Code extension host logs
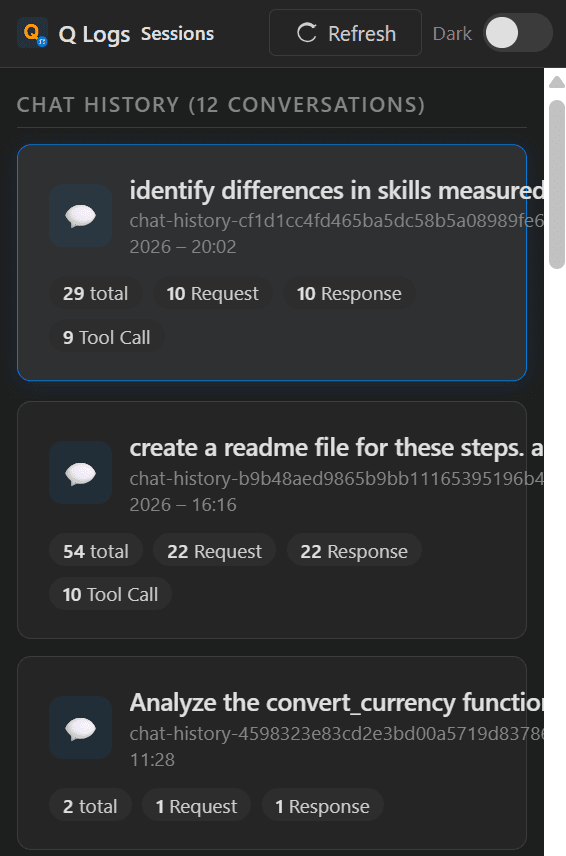
It parses those files and renders sessions as cards, with drill-down into individual log entries.
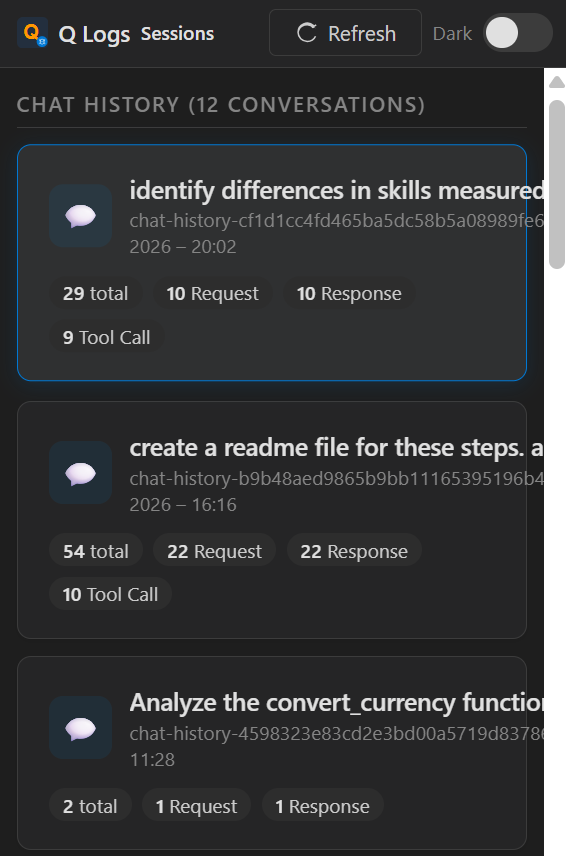
Sessions overview — chat history and log sessions shown as cards

Entry detail view — filter by category, search, and inspect full JSON
Prerequisites
Before starting, install:
npm install -g yo generator-code
Step 1 — Scaffold the Project
Run the Yeoman generator and answer the prompts:
yo code
Choose:
New Extension (TypeScript)
Name:
q-log-session-viewerIdentifier:
q-log-session-viewerDescription: View and analyze local Q-related debug logs and chat history from VS Code
Initialize git: Yes
Bundle with webpack/esbuild: esbuild (faster builds)
Tip: If you prefer to skip Yeoman, just create the folder structure manually. The generator only saves a few minutes.
The generated structure looks like this:
q-log-session-viewer/
├── src/
│   └── extension.ts        ← entry point
├── resources/              ← icons, screenshots
├── .vscodeignore
├── esbuild.js
├── package.json
└── tsconfig.json
Step 2 — Configure package.json
package.json is the heart of a VS Code extension. It declares commands, views, menus, and metadata that VS Code reads at install time.
Here is the full package.json for this extension:
{
  "name": "q-log-session-viewer",
  "displayName": "Q Log Session Viewer (Unofficial)",
  "description": "View and analyze local Q-related debug logs and chat history from VS Code",
  "version": "0.1.1",
  "publisher": "SiddheshPrabhugaonkar",
  "author": {
    "name": "Siddhesh Prabhugankar",
    "url": "https://github.com/siddheshp"
  },
  "license": "MIT",
  "icon": "resources/icon.png",
  "galleryBanner": { "color": "#232F3E", "theme": "dark" },
  "engines": { "vscode": "^1.85.0" },
  "categories": ["Debuggers", "Other"],
  "keywords": ["logs", "debug", "chat", "viewer", "analysis"],
  "activationEvents": [],
  "main": "./out/extension.js",
  "contributes": {
    "commands": [
      {
        "command": "amazonq-logviewer.open",
        "title": "Q Log Session Viewer: Open",
        "icon": {
          "light": "resources/icon-sidebar-light.svg",
          "dark": "resources/icon-sidebar-dark.svg"
        }
      },
      {
        "command": "amazonq-logviewer.refresh",
        "title": "Q Log Session Viewer: Refresh",
        "icon": "$(refresh)"
      }
    ],
    "viewsContainers": {
      "activitybar": [
        {
          "id": "amazonq-logviewer",
          "title": "Q Logs",
          "icon": "resources/icon-sidebar-dark.svg"
        }
      ]
    },
    "views": {
      "amazonq-logviewer": [
        {
          "type": "webview",
          "id": "amazonq-logviewer.viewer",
          "name": "Log Viewer"
        }
      ]
    },
    "menus": {
      "editor/title": [
        { "command": "amazonq-logviewer.open", "group": "navigation" }
      ]
    }
  },
  "scripts": {
    "vscode:prepublish": "npm run compile",
    "compile": "node esbuild.js",
    "watch": "node esbuild.js --watch",
    "package": "vsce package"
  },
  "devDependencies": {
    "@types/node": "^20.11.0",
    "@types/vscode": "^1.85.0",
    "@vscode/vsce": "^3.9.1",
    "esbuild": "^0.20.0",
    "sharp": "^0.34.5",
    "typescript": "^5.3.0"
  }
}
Key things to understand:
| Field | Purpose |
|---|---|
publisher |
Must match your Marketplace publisher ID exactly |
engines.vscode |
Minimum VS Code version required |
activationEvents: [] |
With modern VS Code, contributed commands/views can activate the extension when used |
contributes.viewsContainers |
Registers the Activity Bar icon |
contributes.views |
Registers the webview panel inside the sidebar |
vscode:prepublish |
Script that runs before vsce package |
Step 3 — Set Up esbuild
Instead of the default tsc compiler, this extension uses esbuild for fast bundling. Create esbuild.js:
const esbuild = require('esbuild');

const watch = process.argv.includes('--watch');

const buildOptions = {
  entryPoints: ['src/extension.ts'],
  bundle: true,
  outfile: 'out/extension.js',
  external: ['vscode'],          // vscode is provided by the host, never bundle it
  format: 'cjs',
  platform: 'node',
  target: 'node18',
  sourcemap: true,
  minify: !watch,
};

if (watch) {
  esbuild.context(buildOptions).then(ctx => {
    ctx.watch();
    console.log('Watching for changes...');
  });
} else {
  esbuild.build(buildOptions).then(() => console.log('Build complete'));
}
Important: Always add
vscodetoexternal. It is injected by VS Code at runtime and must never be bundled.
Step 4 — Write the Extension Entry Point
src/extension.ts is the file VS Code calls when the extension activates. It registers commands and the sidebar webview provider:
import * as vscode from 'vscode';
import { LogViewerPanel, LogViewerSidebarProvider } from './logViewerPanel';

export function activate(context: vscode.ExtensionContext) {
  // Register the sidebar webview (Activity Bar panel)
  const sidebarProvider = new LogViewerSidebarProvider(context.extensionUri);
  context.subscriptions.push(
    vscode.window.registerWebviewViewProvider('amazonq-logviewer.viewer', sidebarProvider)
  );

  // Command: open full editor panel
  context.subscriptions.push(
    vscode.commands.registerCommand('amazonq-logviewer.open', () => {
      LogViewerPanel.createOrShow(context.extensionUri);
    })
  );

  // Command: refresh data
  context.subscriptions.push(
    vscode.commands.registerCommand('amazonq-logviewer.refresh', () => {
      LogViewerPanel.currentPanel?.refresh();
      sidebarProvider.refresh();
    })
  );
}

export function deactivate() {}
Two patterns to note:
Push to
context.subscriptions— VS Code automatically disposes these when the extension deactivates, preventing memory leaks.deactivate()— called when VS Code shuts down or the extension is disabled. Leave it empty if you have nothing to clean up.
Step 5 — Read Local Log Files (logProvider.ts)
This class handles all filesystem access. It resolves the correct log paths per OS:
import * as fs from 'fs';
import * as path from 'path';
import * as os from 'os';

export class LogProvider {
  private logBase: string;
  private historyDir: string;

  constructor() {
    const home = os.homedir();
    const platform = os.platform();

    if (platform === 'win32') {
      const appdata = process.env.APPDATA || path.join(home, 'AppData', 'Roaming');
      this.logBase = path.join(appdata, 'Code', 'logs');
    } else if (platform === 'darwin') {
      this.logBase = path.join(home, 'Library', 'Application Support', 'Code', 'logs');
    } else {
      this.logBase = path.join(home, '.config', 'Code', 'logs');
    }

    this.historyDir = path.join(home, '.aws', 'amazonq', 'history');
  }

  // ... getSessionLogs() and getChatHistoryFiles() methods
}
Log paths by OS:
| OS | Extension Logs | Chat History |
|---|---|---|
| Windows | %APPDATA%\Code\logs\...\Amazon Q Logs.log |
~\.aws\amazonq\history\ |
| macOS | ~/Library/Application Support/Code/logs/... |
~/.aws/amazonq/history/ |
| Linux | ~/.config/Code/logs/... |
~/.aws/amazonq/history/ |
Step 6 — Build the Webview Panel (logViewerPanel.ts)
VS Code extensions can render arbitrary HTML inside WebviewPanel (full editor tab) or WebviewView (sidebar). Both are used here.
Security: Content Security Policy + Nonce
Every webview must set a strict CSP. A nonce (random string per render) is used to allow only your inline scripts:
function getNonce(): string {
  let text = '';
  const possible = 'ABCDEFGHIJKLMNOPQRSTUVWXYZabcdefghijklmnopqrstuvwxyz0123456789';
  for (let i = 0; i < 32; i++) {
    text += possible.charAt(Math.floor(Math.random() * possible.length));
  }
  return text;
}
The CSP meta tag in the HTML:
<meta http-equiv="Content-Security-Policy"
  content="default-src 'none';
           style-src 'nonce-${nonce}';
           script-src 'nonce-${nonce}';">
Two-Way Messaging
The webview and extension communicate via postMessage:
// Extension → Webview: send data
panel.webview.postMessage({ command: 'dataLoaded', historyFiles, logSessions });

// Webview → Extension: request data
panel.webview.onDidReceiveMessage(message => {
  if (message.command === 'loadData') {
    const data = logProvider.loadAllData();
    panel.webview.postMessage({ command: 'dataLoaded', ...data });
  }
});
Inside the webview HTML:
const vscode = acquireVsCodeApi();

// Send message to extension
vscode.postMessage({ command: 'loadData' });

// Receive message from extension
window.addEventListener('message', event => {
  if (event.data.command === 'dataLoaded') {
    renderSessions(event.data.historyFiles, event.data.logSessions);
  }
});
Sidebar Provider
export class LogViewerSidebarProvider implements vscode.WebviewViewProvider {
  resolveWebviewView(webviewView: vscode.WebviewView, ...) {
    webviewView.webview.options = {
      enableScripts: true,
      localResourceRoots: [vscode.Uri.joinPath(this._extensionUri, 'resources')]
    };
    webviewView.webview.html = getViewerHtml(getNonce());
    // ... message handler
  }
}
Step 7 — Add Icons
VS Code requires icons in specific formats:
Marketplace icon:
resources/icon.png— 128×128 PNG, referenced inpackage.jsonas"icon"Activity Bar icon: SVG file — VS Code tints it automatically to match the theme; keep it a simple monochrome shape
"viewsContainers": {
  "activitybar": [
    {
      "id": "amazonq-logviewer",
      "title": "Q Logs",
      "icon": "resources/icon-sidebar-dark.svg"
    }
  ]
}
Gotcha: Activity Bar icons are always rendered as monochrome by VS Code regardless of the SVG colors. Design them as single-color silhouettes.
Step 8 — Configure .vscodeignore
.vscodeignore works like .gitignore but for the packaged .vsix file. Exclude everything that isn't needed at runtime:
.vscode/**
node_modules/**
src/**
esbuild.js
tsconfig.json
**/*.map
**/*-b64.txt
resources/screenshots/*.png
Keep in the package:
out/extension.js(compiled bundle)resources/(icons used by the extension)package.jsonREADME.mdLICENSE
Step 9 — Test Locally
Press F5 in VS Code to launch the Extension Development Host — a second VS Code window with your extension loaded.
You'll see the Q Logs icon appear in the Activity Bar:
Iterate quickly with:
npm run watch
esbuild rebuilds in milliseconds on every save. Reload the Extension Development Host with Ctrl+R (or Cmd+R on Mac) to pick up changes.
Step 10 — Package the Extension
Install vsce (the VS Code Extension CLI) if you haven't already:
npm install -g @vscode/vsce
Then package:
vsce package
This produces a .vsix file (e.g. q-log-session-viewer-0.1.1.vsix). You can install it locally to test the final artifact:
code --install-extension q-log-session-viewer-0.1.1.vsix
Step 11 — Create a Publisher Account
Sign in with a Microsoft account
Click Create publisher
Choose a publisher ID (e.g.
SiddheshPrabhugaonkar) — this must match the"publisher"field inpackage.jsonexactly
You also need a Personal Access Token (PAT):
Go to https://dev.azure.com → your organization → User Settings → Personal Access Tokens
Click New Token
Set scope to Marketplace → Manage
Copy the token — you won't see it again
Authenticate vsce with your token:
vsce login SiddheshPrabhugaonkar
# Paste your PAT when prompted
Step 12 — Write a Good README
The README.md in your extension folder becomes the Marketplace listing page. Make it count:
Lead with what the extension does and who it's for
Include screenshots (host them on GitHub or a CDN — relative paths don't work on the Marketplace)
List features, commands, and requirements
Add a disclaimer if your extension reads data from another product
Screenshot URLs must be absolute:

Tip: Create a separate public GitHub repo just for assets (screenshots, GIFs). This keeps your extension repo clean and the URLs stable.
Step 13 — Publish to the Marketplace
vsce publish
That's it. vsce will:
Run
npm run vscode:prepublish(which runsnpm run compile)Package the
.vsixUpload it to the Marketplace
To publish a specific version bump:
vsce publish patch   # 0.1.0 → 0.1.1
vsce publish minor   # 0.1.0 → 0.2.0
vsce publish major   # 0.1.0 → 1.0.0
After a few minutes your extension appears at: https://marketplace.visualstudio.com/items?itemName=SiddheshPrabhugaonkar.q-log-session-viewer
Step 14 — Update the Extension
For subsequent releases:
Make your code changes
Update
CHANGELOG/ release notes inREADME.mdRun
vsce publish patch(orminor/major)
The Marketplace auto-notifies users who have the extension installed.
Project File Structure (Final)
VSCodeExtention/
├── resources/
│   ├── icon.png                  ← Marketplace icon (128×128 PNG)
│   ├── icon-sidebar-dark.svg     ← Activity Bar icon
│   └── icon-sidebar-light.svg
├── src/
│   ├── extension.ts              ← activate() / deactivate()
│   ├── logProvider.ts            ← filesystem reads
│   └── logViewerPanel.ts         ← WebviewPanel + WebviewView + HTML
├── .vscodeignore
├── esbuild.js
├── package.json
├── tsconfig.json
└── README.md
Key Concepts Recap
| Concept | What it does |
|---|---|
contributes.viewsContainers |
Adds an icon to the Activity Bar |
contributes.views |
Registers a panel inside that container |
WebviewPanel |
Full editor tab with custom HTML |
WebviewViewProvider |
Sidebar panel with custom HTML |
postMessage / onDidReceiveMessage |
Two-way communication between extension and webview |
| Nonce + CSP | Security: prevents XSS in webviews |
context.subscriptions |
Automatic cleanup on deactivation |
vsce package |
Creates the installable .vsix |
vsce publish |
Uploads to the VS Code Marketplace |
Common Gotchas
vscodemust be inexternalin your bundler config — never bundle itMarketplace icon must be PNG, not SVG
Screenshot URLs in README must be absolute — relative paths break on the Marketplace page
Publisher ID in
package.jsonmust exactly match your Marketplace publisher accountActivity Bar SVG icons are always monochrome — VS Code tints them; don't rely on color
CSP
default-src 'none'— be explicit about what your webview is allowed to load; no external CDNs unless you add them to the CSP
Resources
Built by Siddhesh Prabhugankar — Microsoft Certified Trainer & AI Consultant
GitHub: github.com/siddheshp · LinkedIn: linkedin.com/in/siddheshprabhugaonkar